


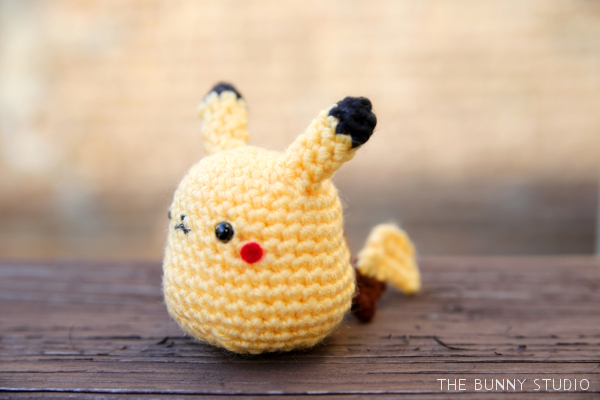
Pokemon Go revived nostalgic feelings in many of us, and it was incredible to see the number of people it brought out to the parks this summer. Sadly, the game isn't so popular anymore, but my love for Pokemon is here to stay! I recently designed this palm-sized Pikachu amigurumi pattern that I'm excited to share.

Finished Measurements:
Approximately 2¼" x 2¼" x 2¼" (not including ears or tail)
Materials:
- Vanna's Choice Baby Yarn in "Duckie" Yellow (worsted-weight yarn, less than a skein)
- Caron Simply Soft in black and brown (worsted-weight yarn, small amounts)
- G hook (4.00 mm)
- 6 mm safety eyes
- small amount of red felt
- black embroidery thread
- tapestry needle
- polyester filling
- hot glue
Body:
Round 1: With yellow, 6 sc in magic ring. (6 st)
Round 2: 2 sc in ea st around. (12 st)
Round 3: *2 sc, sc in next st*, rep 6 times. (18 st)
Round 4: *2 sc, sc in next 2 st*, rep 6 times. (24 st)
Round 5: *2 sc, sc in next 3 st*, rep 6 times. (30 st)
Rounds 6-9: Sc in ea st around. (30 st)
Round 10: *2 sc, sc in next 4 st*, rep 6 times. (36 st)
Rounds 11-14: Sc in ea st around. (36 st)
Round 15: *Sc2tog, sc in next 4 st*, rep 6 times. (30 st)
Insert eyes between rounds 8 and 9, six stitches apart. Using black embroidery thread, stitch on a small W-shape for the mouth and a short line above it for a nose. Using brown yarn, sew a stripe on the back between rows 9 and 10 and a second one between rows 11 and 12. Begin stuffing the body with polyester filling.
Round 16: *Sc2tog, sc in next 3 st*, rep 6 times. (24 st)
Round 17: *Sc2tog, sc in next 2 st*, rep 6 times. (18 st)
Round 18: *Sc2tog, sc in next st*, rep 6 times. (12 st)
Round 19: Sc2tog 6 times. (6 st)
Fasten off and weave in ends.

Ears (make 2):
Round 1: With black, 4 sc in magic ring. (4 st)
Round 2: *2 sc, sc in next st*, rep twice. (6 st)
Round 3-7: Switch to yellow. Sc in ea st around. (6 st)
Fasten off and leave tail for sewing.
Tail:
Note that the stitch counts in parentheses include single crochet stitches only, not chains.
Holding two strands of brown together, ch 3.
Row 1: Sc in 2nd ch from hook, sc in next st, ch 2, turn. (2 st)
Row 2: Sc in 2nd ch from hook, sc in next st. Switch to holding two strands of yellow together, ch 1, turn. (2 st)
Row 3: Sc in ea st, ch 4, turn. (2 st)
Row 4: Sc in 2nd ch from hook and in ea ch across, sc in next st, ch 1, turn. (4 st)
Row 5: Sc in each st across. (4 st)
Fasten off and leave tail for sewing.

Assembly:
1. Sew each ear at an angle on the head.
2. Sew tail at two rows below second stripe.
3. Cut two small circles from red felt and use hot glue to attach to the face.
Pikachu from Pokémon is copyrighted ©The Pokémon Company. All photos and text are copyrighted
©The Bunny Studio. Please do not
sell, reprint, or distribute this pattern in part or in whole without my
written permission. If you would like to share this pattern, you are welcome to
link to this page. Thank you.
The link to "read more" and go to the actual pattern doesn't take you anywhere. :( It's an adorable Pikachu! I hope to be able to stitch it soon!
ReplyDeleteHi SapphireSW, thanks for bringing the issue to my attention! I just updated the mobile layout. It looks like the link works now, but let me know if you are still unable to view the pattern.
DeleteWhen it says repeat pattern twice from *, does that mean i repeat 2 times in total or two more times from the first mention of it. So basically do i do it 2 or 3 times total?
DeleteHi Brooklyn! 2 times total.
DeleteSo for example, the instructions for round 2 of the ear says:
*2 sc, sc in next st*, rep twice. (6 st)
The pattern between ** would create 3 stitches. Doing it 2 times total would give you the final count of 6 stitches in the round.
I hope this helps. Please let me know if you have more questions!
Hey! I was wondering if I'd be able to sell the Pikachu that I made? I'd give you credit for the pattern.
ReplyDeleteHi Klara, Pikachu is a copyrighted character owned by The Pokemon Company, so I'm afraid that I cannot grant permission. Thank you for understanding!
DeleteHi !! Is this a spiral pattern ? I don't need to do a ch before I start new row ?
ReplyDeleteYes, this is worked continuously! No need for a chain at the beginning of a row.
DeleteHey :) I was wondering if it was necessary for me to turn pikachu's body inside out so the correct side is shown. Or should I just leave it as is?
ReplyDeleteHi! My Pikachu has the "right" side of the fabric facing outward (the front of the stitches are shown on the outside). So depending on how you crochet, you may need to turn it inside out. Little Yarn Friends and All About Ami have great explanations and pictures on how to determine which side is the "right" side:
Deletehttp://littleyarnfriends.com/post/21433094248/crochet-tips-how-to-differentiate-right-side
http://www.allaboutami.com/rightside/
I hope this helps! Of course, you are welcome to go with whichever side you like best. :)
Thanks! This really helped and I'm looking forward to finishing this pikachu :)
DeleteYou're welcome!
DeleteI'm trying to follow the pattern exactly, since this will be my first amigurumi and first crochet project with pattern, but it doesn't seem like the eyes go between the 8th and 9th row. The one in tyre picture has it higher, I think...
ReplyDeleteHello, I'm honored that you chose my pattern for your first amigurumi! I checked my Pikachu and can confirm that the eyes go between the 8th and 9th rows. Are you crocheting through both the front and back loops of your work?
DeleteIt's my fault, I thought it was a bottom to top pattern and actually went so far as to sew the mouth upside down. Learned some things and loved the results!
DeleteGlad it worked out!
DeleteIts so cute and mine turned out cute as well, Im so happy I found this Website.You are doing a great Job!
ReplyDeleteThank you! :)
ReplyDeleteJust to confirm, Is this worked top to bottom? or bottom to top?
ReplyDeleteI am hoping to slightly modify it, by leaving the bottom open, with no stuffing, working my last row (probably about 4 rows up?) worked around a loom band, for elasticity... and turn it into an EOS holder keychain :) Happy to share pictures when I am done.
Hi, sorry for the delayed response. This is worked from top to bottom!
Deletei didnt understand how to make the tail
ReplyDeleteHi, can you let me know which part is confusing? I'll try my best to explain!
DeleteOmg, it's so cute!
ReplyDeleteInax